All questions
Question 1
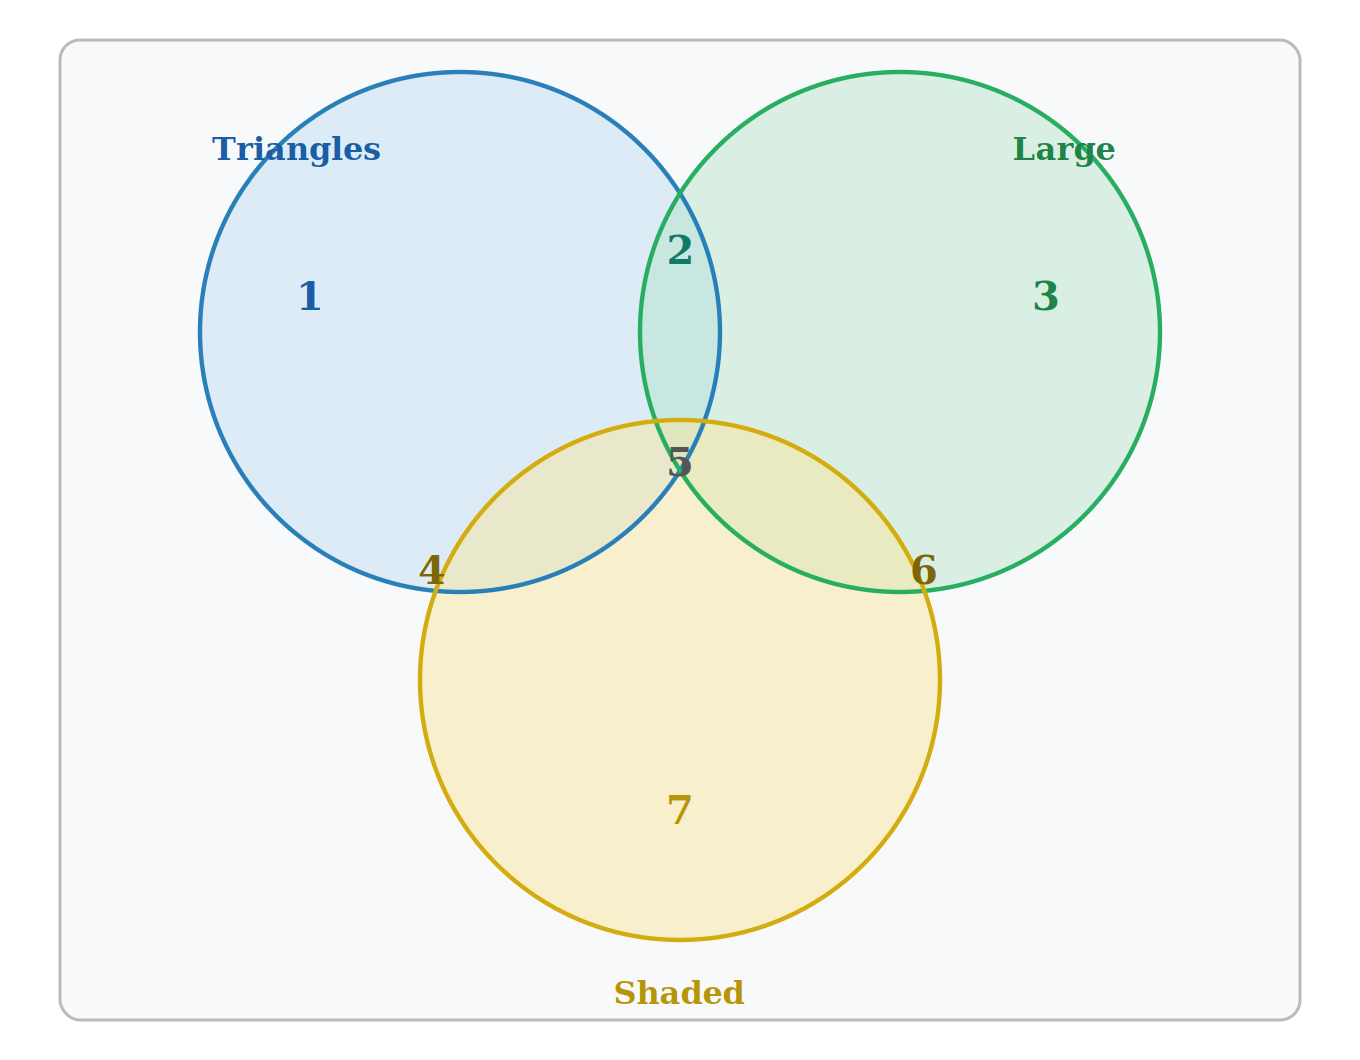
Look at the three overlapping circles shown with labeled regions. Which region represents items that are triangles AND shaded, but NOT large?
- Region 2
- Region 4 (correct answer)
- Region 5
- Region 7
Explanation: Region 4 is the intersection of 'Triangles' and 'Shaded' only, excluding 'Large.' Region 2 is only Triangles. Region 5 is the center (all three). Region 7 is only Shaded. A common error is selecting Region 5 because it includes both triangles and shaded, but that region also includes 'Large,' which the question excludes.
Question 2
A mirror image of an analog clock reads 2:50. What is the actual time?
- 8:10
- 10:50
- 9:10 (correct answer)
- 2:50
Explanation: On an analog clock, a mirror reverses the face around the 12-6 axis, so the real time is 12:00 minus the reflected time. 12:00 - 2:50 = 9:10. The likely trap is 8:10, which comes from subtracting using 11:00 instead of the full 12-hour circle.
Question 3
A right-facing arrow with a dot above it is rotated 90 degrees counterclockwise. What is the result?
- Up arrow, dot on right
- Left arrow, dot below it
- Right arrow, dot on left
- Up arrow, dot on left (correct answer)
Explanation: Rotate the arrow 90 degrees counterclockwise: an east-facing arrow becomes up-facing. The dot above the arrow is on top before rotation; rotating that position counterclockwise carries it to the left side. So you get an up arrow with a dot on its left. The tempting mix-up is putting the dot on the right, which is what a clockwise rotation would do.
Question 4
Square: dot upper-left, arrow up. Each step dot moves one corner clockwise and arrow turns 90° clockwise. After 3 steps?
- Lower-left, arrow down
- Lower-left, arrow left (correct answer)
- Lower-right, arrow down
- Upper-left, arrow up
Explanation: Starting at upper-left with arrow up, move the dot three corners clockwise: upper-left to upper-right to lower-right to lower-left. Turn the arrow 90 degrees clockwise three times: up to right to down to left. So after 3 steps you get lower-left, arrow left. The tempting wrong answer is lower-left with arrow down, which comes from moving the dot three steps but turning the arrow only twice.
Question 5
Three unit cubes form an L: two side by side, the third on top of the left cube. What is their total surface area?
- 16 square units
- 14 square units (correct answer)
- 18 square units
- 12 square units
Explanation: Each cube has 6 faces, so 18 faces total before counting overlaps. The side-by-side pair hides one face from each cube, and the top cube hides one face from itself and from the left cube: 4 hidden faces total. 18 - 4 = 14. The tempting wrong answer is 18, from adding the faces without subtracting the shared faces.
Question 6
In a cross-shaped cube net, face 1 is central; 2 above, 3 below, 4 left, 5 right, 6 beyond 4. Which face is opposite 6?
- Face 1 (correct answer)
- Face 2
- Face 4
- Face 5
Explanation: When you fold the net, face 4 becomes the left side of the cube. Face 6 is attached to the outer edge of face 4, so that edge becomes the back edge. Therefore face 6 folds around to become the back face, directly opposite the central face 1. The tempting wrong answer is Face 5, but face 5 is the right side, adjacent to face 1, not opposite face 6.
Question 7
Use the scatter plot. Which statement best describes the correlation between variables X and Y?
- A. Strong positive linear correlation
- B. Weak positive linear correlation
- C. Strong negative linear correlation (correct answer)
- D. No noticeable correlation
Explanation: Points cluster closely along a downward-sloping line, indicating a strong negative correlation: as X increases, Y decreases significantly. Options A and B would imply upward slope; option D ignores the clear trend.
Question 8
Look at the figure shown. The large shape is made by combining several smaller identical triangles. How many triangles of ANY size can be counted in the figure?
- 9
- 13
- 16 (correct answer)
- 18
Explanation: Count systematically by size: 9 smallest triangles (6 upward-pointing, 3 downward-pointing), 3 medium triangles made of 4 small triangles each, 3 medium inverted triangles, and 1 large triangle encompassing the whole figure. Total: 9 + 3 + 3 + 1 = 16 triangles. Choice A counts only the smallest units. Choices B and D result from incomplete systematic counting.
Question 9
Use the Venn-style diagram. Which option shows the region representing (A ∪ C) ∩ B?
- A. Shaded only where A and B overlap
- B. Shaded only where B and C overlap
- C. Shaded where A, B, and C all overlap
- D. Shaded where B overlaps either A or C (correct answer)
Explanation: The union A ∪ C is everything in circles A or C. Intersecting that with B leaves just the parts of B that overlap with A or C. That is exactly option D. Options A and B neglect portions, and option C is too limited—only the triple overlap.
Question 10
Refer to the geometric solid. Which 2-D view is obtained when the solid is projected from the front?
- A. A rectangle 3 units wide and 2 units tall
- B. An L-shape comprised of two squares
- C. A T-shape three units wide with one-unit stem (correct answer)
- D. A plus sign of five equal squares
Explanation: From the front, the tallest central column plus shorter side blocks produce a capital T silhouette—three units across the top and one-unit stem downward. Only option C describes that. The rectangle (A) ignores the missing lower corners, the L-shape (B) lacks one side, and D overstates the blocks.
Question 11
Based on the net of a cube shown, which option represents the three faces that will meet at vertex X after folding?
- A. Faces numbered 1, 2, 5 (correct answer)
- B. Faces numbered 1, 3, 4
- C. Faces numbered 2, 3, 6
- D. Faces numbered 4, 5, 6
Explanation: In the given cross-shaped net, faces 1, 2, and 5 share edges that converge when folded, meeting at vertex X. Other sets include at least one face that lies opposite the vertex, so they cannot all meet there.
Question 12
Refer to the grid below. A token starts at square S and moves according to the rules shown by the arrows: each gray square pushes the token one step in the arrow's direction, and each white square ends the token's movement. Where does the token end up?
- Square P
- Square Q
- Square R (correct answer)
- Square T
Explanation: Starting at S, follow the arrows: S (right arrow) → next square (down arrow) → next square (right arrow) → next square (down arrow) → lands on white square R, ending movement. A student tracing only 2 steps lands at P. Following only the rightward arrows without downward turns leads to Q. Overshooting one square leads to T.
Question 13
Refer to the figure below. A paper is folded in half twice (first horizontally, then vertically), then a single triangular notch is cut from the folded corner indicated. When the paper is unfolded, how many total triangular holes appear?
- 1
- 2
- 3
- 4 (correct answer)
Explanation: Each fold doubles the number of paper layers at the cut site. Two folds = 4 layers. A single cut through 4 layers produces 4 holes when unfolded. Choice A ignores the folding. Choice B accounts for only one fold. Choice C is a common off-by-one error.
Question 14
Refer to the figure. The three views (top, front, side) of a solid made of unit cubes are shown. What is the minimum number of unit cubes needed to build a solid with these three views?
- 4
- 5 (correct answer)
- 6
- 7
Explanation: Analyzing the top view shows an L-shape of 4 squares, and the front and side views each show height-2 stacks at one position. The minimum arrangement places 4 cubes on the base and 1 stacked cube where front and side both require height 2. Total = 5 cubes. Choice A misses one required stack. Choices C and D add unnecessary cubes.
Question 15
Refer to the figure. The shape on the left is folded along the dotted line. Which figure on the right shows the correct result?
- Figure A
- Figure B
- Figure C
- Figure D (correct answer)
Explanation: Folding along a vertical dotted line reflects the right half onto the left half. The star on the right side lands on top of the circle on the left, producing an overlapping star-in-circle mark at that position. Figure A shows the star unreflected. Figure B reflects but ignores the overlap. Figure C reflects in the wrong direction.
Question 16
Refer to the diagram below. Five gears are connected as shown. Gear A is turned clockwise. In which direction does Gear E turn?
- Clockwise (correct answer)
- Counterclockwise
- It does not turn
- It turns clockwise then reverses
Explanation: Meshed gears alternate direction. A→B reverses (counterclockwise), B→C reverses (clockwise), C→D reverses (counterclockwise), D→E reverses (clockwise). With 4 meshings between A and E, the direction flips 4 times, returning to clockwise. Choice B assumes an odd number of meshings. Choice C would require a jammed gear. Choice D has no basis in steady rotation.
Question 17
Look at the figures shown. Which answer figure shows what the target figure looks like when it is reflected across the horizontal line (flipped top to bottom)?
- Figure A
- Figure B (correct answer)
- Figure C
- Figure D
Explanation: A reflection across a horizontal line swaps top and bottom but leaves left and right unchanged. Figure B correctly flips vertically. Figure A is a left-right reflection. Figure C is a 180° rotation (both flips combined). Figure D is the original unchanged.