All questions
Question 1
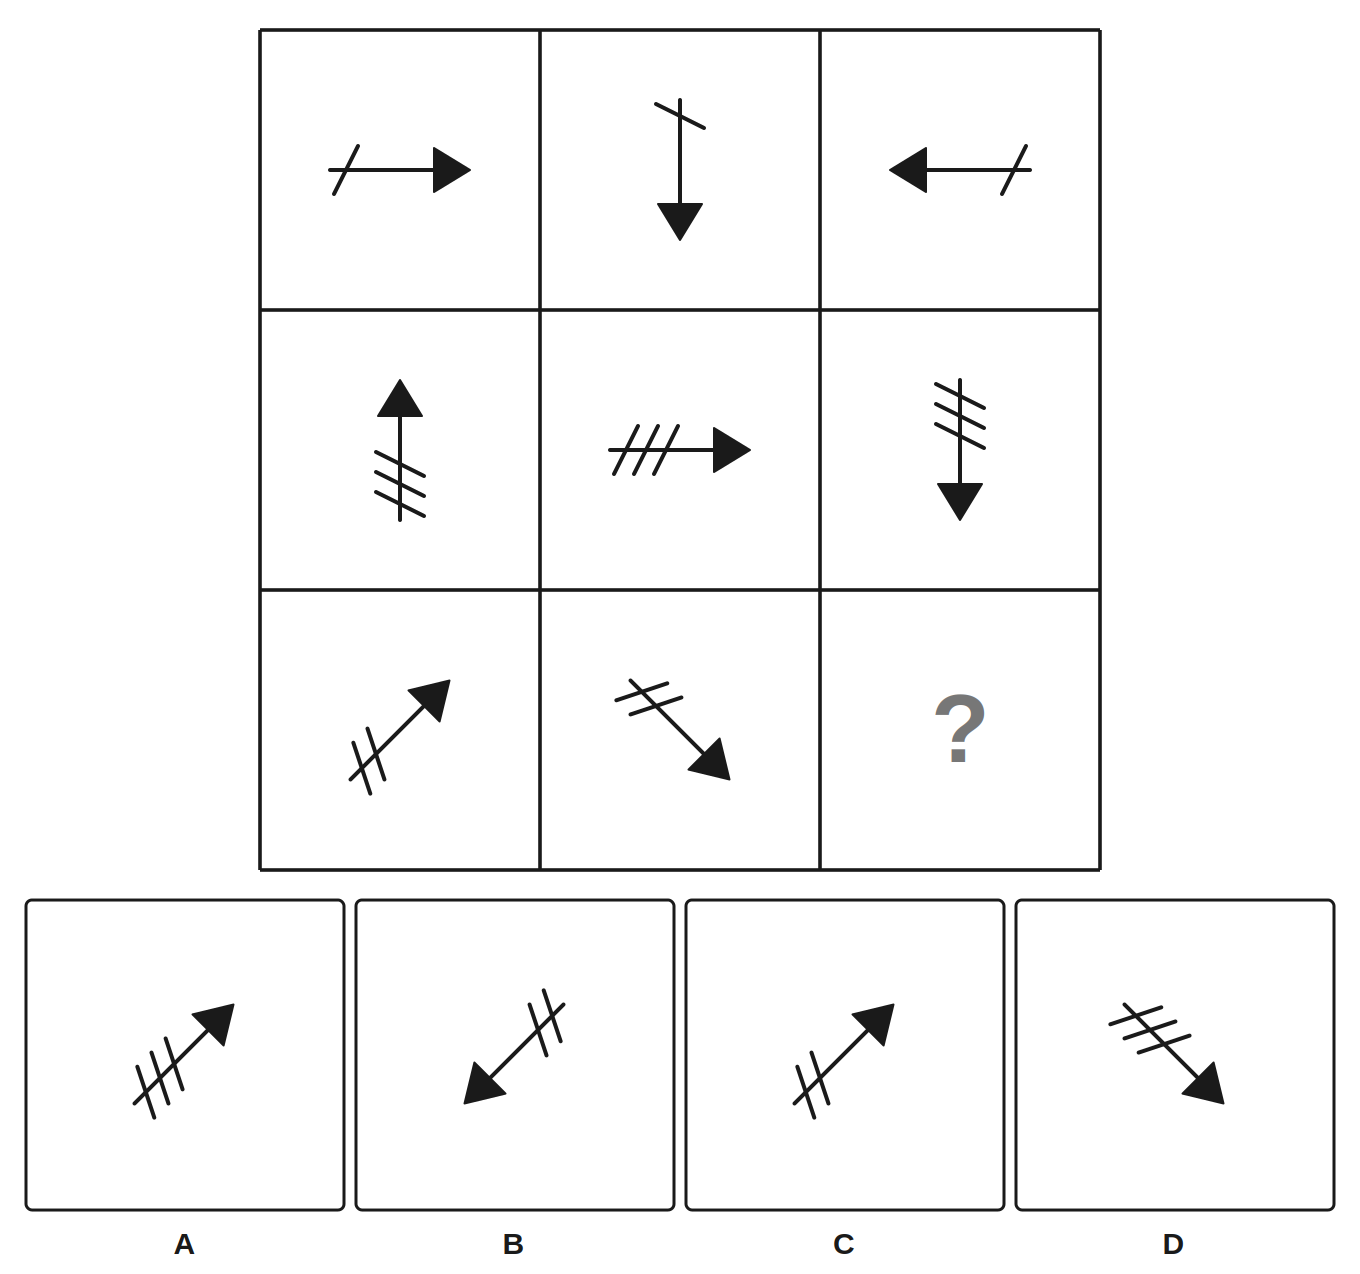
Refer to the figure matrix. What belongs in the empty cell?
- An arrow pointing up-right with three feathers
- An arrow pointing down-left with two feathers (correct answer)
- An arrow pointing up-right with two feathers
- An arrow pointing down-right with three feathers
Explanation: Across each row, the arrow rotates 90° clockwise from the first to second cell, then 90° clockwise again from second to third. The number of feathers on the tail in each row is constant. Row 3: arrows have 2 feathers each; first points up-right, rotated 90° clockwise gives down-right (second), another 90° clockwise gives down-left. Choice A: wrong direction and feather count. Choice C: wrong direction (un-rotated). Choice D: wrong feather count and wrong direction.
Question 2
Matrix rows: 1 black tri, white sq, black tri; 2 white pent, black hex, white pent; 3 black hex, white hept, ?
- white hexagon
- black heptagon
- black hexagon (correct answer)
- white heptagon
Explanation: Each row is symmetric: the two outer shapes match, and the middle shape has one more side than the outer shapes. Row 3 starts with a black hexagon and has a white heptagon in the middle, so the missing outer shape is a black hexagon. The tempting wrong choice is white hexagon, which gets the shape right but ignores the black-white-black color pattern.
Question 3
Figure matrix: 1 black tri, white sq, black pent; 2 white sq, black pent, white hex; 3 black pent, white hex, ?
- black heptagon (correct answer)
- white heptagon
- black octagon
- white hexagon
Explanation: Each row shifts one place left, so the missing figure continues the sequence triangle, square, pentagon, hexagon, heptagon. Colors alternate black, white, black, white, black, so the heptagon must be black. White heptagon is tempting because it has the right number of sides, but it uses the wrong color in the alternating pattern.
Question 4
Figure matrix: 1 sm circle, med square, lg triangle; 2 med triangle, lg circle, sm square; 3 lg square, sm triangle, ?
- small circle
- large circle
- medium circle (correct answer)
- medium square
Explanation: Each row and column must contain one circle, one square, and one triangle, and one small, one medium, and one large. Row 3 already has a large square and a small triangle, so the missing figure must be a circle and must be the medium size. The tempting large circle uses the right shape but repeats the large size already taken by the square.
Question 5
Arrows: 1 black up, white right, black down; 2 white right, black down, white left; 3 black down, white left, ?
- white up arrow
- black up arrow (correct answer)
- black left arrow
- white right arrow
Explanation: The colors in each column alternate black, white, black, so the missing arrow is black. The directions in each column turn clockwise one step: down becomes left, so left becomes up. Thus the missing arrow is black up. The tempting mistake is black left, because it treats the row as sliding left without noticing the column pattern.
Question 6
Dot path (3x3): row1 top-left, top-mid, top-right; row2 top-mid, top-right, mid-right; row3 top-right, mid-right, ?
- bottom-middle
- middle-center
- bottom-left
- bottom-right (correct answer)
Explanation: Trace the dots along the outer edge: top-left to top-middle to top-right, then down to middle-right. Continuing around the same border, the next dot is bottom-right. The tempting middle-center choice would break the edge path by cutting inward.
Question 7
Look at the 3x3 matrix of figures. The bottom-right cell is missing. Which figure completes the matrix?
- A black square divided by one horizontal line
- A black circle divided by two vertical lines
- A black triangle divided by two horizontal lines (correct answer)
- A black triangle divided by one horizontal line
Explanation: Reading across each row: the shape stays constant within a row, but the number of internal dividing lines increases by one from left to right, and all shapes in the third row are black. Row 3 shows black triangles; the first has no lines, the second has one horizontal line, so the third must be a black triangle with two horizontal lines. Choice A changes the shape. Choice B uses vertical lines (the third row's lines are horizontal). Choice D has only one line.
Question 8
Refer to the 3x3 figure matrix. Which figure belongs in the empty cell?
- A square divided into 4 quadrants with the top-right shaded
- A square divided into 4 quadrants with the bottom-left shaded
- A square divided into 4 quadrants with the bottom-right shaded (correct answer)
- A square divided into 4 quadrants with the top-left shaded
Explanation: The shaded quadrant moves counterclockwise by one position from cell to cell within each row. Row 3: cell 1 has top-left shaded; cell 2 has bottom-left shaded (one CCW step); cell 3 should have bottom-right shaded (another CCW step). Choice A is one step too far or wrong direction. Choice B repeats cell 2. Choice D repeats cell 1.
Question 9
Study the figure matrix. Which figure completes the pattern in the bottom row?
- A clock face showing 3:00
- A clock face showing 9:00 (correct answer)
- A clock face showing 6:00
- A clock face showing 12:00
Explanation: In each row, the hour hand moves forward by a fixed amount. Row 1 advances by 3 hours per cell (12→3→6). Row 2 advances by 2 hours per cell (1→3→5). Row 3 advances by 4 hours per cell: 1:00 → 5:00 → 9:00. The minute hand stays at 12 in all cells. Choice A (3:00) would result from adding 2. Choice C (6:00) uses row 1's rule. Choice D (12:00) resets to start.
Question 10
Based on the figure matrix shown, which figure belongs in the missing cell?
- A grid of 9 squares with the center and 4 corners shaded (correct answer)
- A grid of 9 squares with the 4 corners shaded only
- A grid of 9 squares with the center and 4 edges shaded
- A grid of 9 squares with only the center shaded
Explanation: The rule across each row: cell 3 shows all squares that are shaded in EITHER cell 1 OR cell 2 (a logical OR / union). Row 3 cell 1 shades center only; cell 2 shades the 4 corners; the union is center + 4 corners. Choice B omits the center (treats it as XOR or ignores cell 1). Choice C confuses corners with edges. Choice D ignores cell 2.
Question 11
Look at the figure matrix. The rule in each row adds one element from the first cell to the second cell to produce the third cell. Which figure belongs in the missing cell?
- A circle containing a triangle and a square
- A circle containing a triangle, a square, and a diamond (correct answer)
- A circle containing a square and a diamond
- A circle containing two triangles and a square
Explanation: The rule is additive: the third cell in each row contains the union of shapes inside the circles of the first two cells. Row 3: cell 1 contains {triangle, square}, cell 2 contains {diamond}, so cell 3 must contain {triangle, square, diamond}. Choice A omits the diamond (ignores cell 2). Choice C omits the triangle. Choice D duplicates the triangle.
Question 12
Refer to the figure matrix. Which figure completes the last row?
- 6 black dots arranged in two rows of three
- 5 black dots arranged in a cross
- 6 black dots arranged in a triangular pattern (correct answer)
- 4 black dots arranged in a square
Explanation: In each row, the number of dots in cell 3 equals the sum of dots in cells 1 and 2, AND the arrangement in cell 3 matches the SHAPE outline formed by the dots in cell 1. Row 3: cell 1 has 3 dots in a triangle, cell 2 has 3 dots in a line; sum = 6, arranged in a triangular pattern (matching cell 1's shape). Choice A has 6 dots but wrong arrangement. Choice B has wrong count. Choice D has wrong count.
Question 13
Study the matrix of figures below. Which figure completes the pattern?
- A square rotated 45° with a dot in the top corner
- A square (not rotated) with a dot in the top-left corner
- A square rotated 45° with a dot in the right corner (correct answer)
- A square rotated 45° with a dot in the bottom corner
Explanation: In each row, the figure rotates 45° clockwise from left to right, and the dot remains fixed at the 'top' position relative to the original (un-rotated) orientation—meaning it moves clockwise around the shape. Row 3 starts with an upright square with a dot at top-left; after one 45° rotation the dot is at the top corner of the diamond; after another 45° it is at the right corner. Choice A places the dot at top. Choice B fails to rotate. Choice D over-rotates.