All questions
Question 1
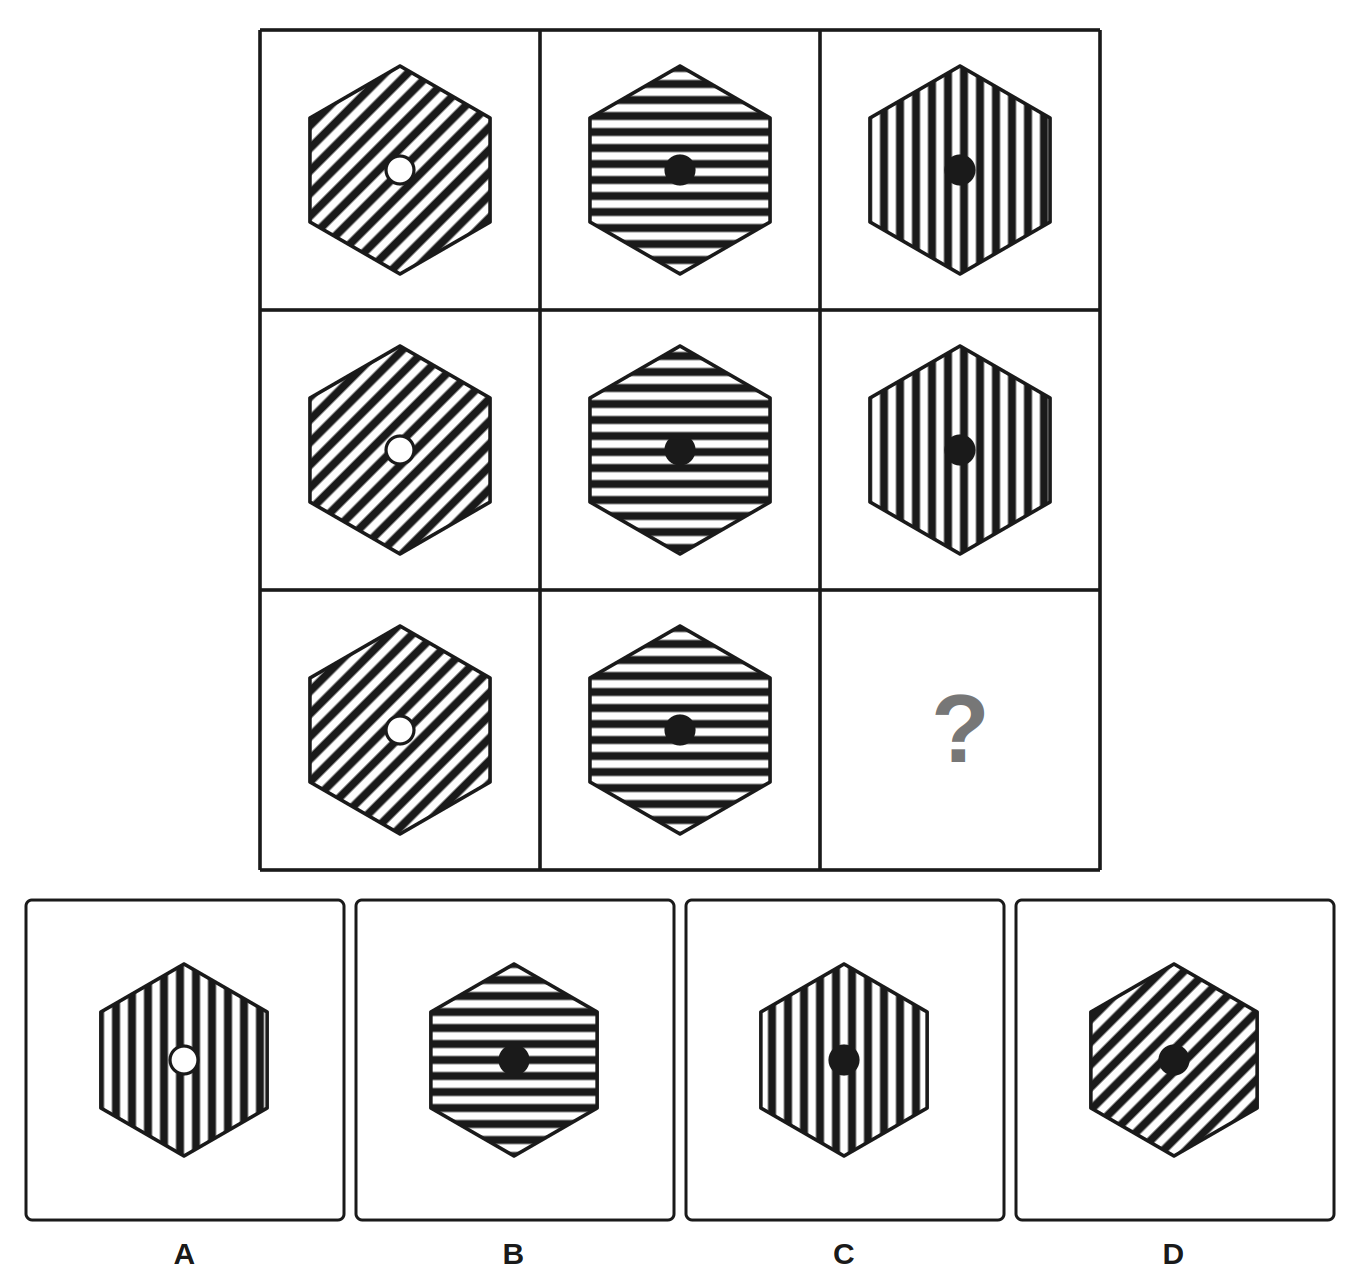
Refer to the figure matrix below. Which option completes the pattern?
- A hexagon with horizontal stripes and a white dot in the center
- A hexagon with vertical stripes and a black dot in the center
- A hexagon with horizontal stripes and a black dot in the center (correct answer)
- A hexagon with diagonal stripes and a black dot in the center
Explanation: Two rules operate: (1) the shading pattern cycles diagonal → vertical → horizontal across each row; (2) the interior dot color alternates white, black, black across each row. Row 3 should end in a horizontal-striped hexagon with a black dot. A has the wrong dot color. B uses the wrong stripe orientation. D fails to advance the stripe pattern.
Question 2
Look at the 3x3 figure matrix. Which answer fills the missing cell?
- Pentagon containing 2 horizontal lines (correct answer)
- Pentagon containing 3 horizontal lines
- Pentagon containing 4 horizontal lines
- Pentagon containing 5 horizontal lines
Explanation: In each row, the number of lines in column 3 follows the pattern: (lines in col 1) + (lines in col 2) - 2. Row 1: 3 + 2 - 2 = 3 ✓. Row 2: 4 + 3 - 2 = 5 ✓. Row 3: 2 + 2 - 2 = 2. Therefore, the missing cell should contain 2 horizontal lines.
Question 3
Refer to the matrix shown. Which figure correctly completes it?
- A large white star containing a small black square
- A large black star containing a small white square (correct answer)
- A large black star containing a small black square
- A large white star containing a small white square
Explanation: Rule: across each row, the outer shape's color inverts from col 1 to col 3, and the inner shape's color also inverts. Row 3 col 1 is a white star with a black square; col 3 should have both colors inverted to a black star with a white square. A leaves outer color unchanged. C fails to invert the inner shape. D inverts only the inner shape.
Question 4
Examine the 3x3 matrix. Which figure belongs where the question mark is?
- A single black dot
- A white circle (empty) (correct answer)
- Two black dots side by side
- Three black dots in a triangular arrangement
Explanation: In each row, column 3 = column 1 MINUS column 2 (the elements of column 2 are removed from column 1). Row 3 column 1 shows two black dots; column 2 shows the same two black dots; subtracting leaves an empty cell, represented by a white (empty) circle placeholder. A misapplies subtraction (removes only one). C performs addition instead of subtraction. D adds extra elements not present in column 1.
Question 5
Top-left: outline arrow up. Top-right: outline arrow right with dot. Bottom-left: shaded arrow up. Bottom-right?
- shaded arrow up with dot
- outline arrow right with dot
- shaded arrow right with dot (correct answer)
- shaded arrow left with dot
Explanation: Each row keeps the same fill, so the bottom row must be shaded. The arrow also rotates from up to right and gains a dot, matching the top row's change. Thus bottom-right is shaded arrow right with dot. The tempting shaded arrow up with dot fails because it doesn't rotate the arrow.
Question 6
Top-left: outline circle with dot. Top-right: shaded circle with dot. Bottom-left: outline triangle. Bottom-right?
- shaded triangle, no dot (correct answer)
- shaded triangle, with dot
- shaded circle, no dot
- outline triangle, no dot
Explanation: Across the top row, both circles have dots; across the bottom row, both triangles should have no dots. Down the left side the shapes are outline, and down the right side they are shaded. So the missing box is a shaded triangle with no dot. The tempting wrong answer is a shaded triangle with a dot, but the dot belongs to the top row, not to the triangle.
Question 7
Top-left: square + two lines + dot. Top-right: square + one line + dot. Bottom-left: circle + two lines. Bottom-right?
- square + one line, no dot
- circle + one line, no dot (correct answer)
- circle + two lines, no dot
- circle + one line, with dot
Explanation: Follow the grid: the left column has two lines, the right column has one line. The top row has a dot, the bottom row does not. So the missing cell must combine circle, one line, and no dot. The tempting wrong answer is circle + one line with a dot, which keeps shape and line count but wrongly carries the dot down from the top row.
Question 8
Top-left: arrow up. Top-right: arrow right. Bottom-left: arrow up with star. Bottom-right?
- arrow right, with star (correct answer)
- arrow right, no star
- arrow left, with star
- arrow up, with star
Explanation: Each column repeats the same arrow direction from top to bottom, and the bottom row adds a star. The top-right arrow is right, so the bottom-right must also point right and include the star. The tempting wrong answer is arrow right with no star, because it copies direction but misses the star pattern.
Question 9
Top-left: up arrow with two dots. Top-right: down arrow with two dots. Bottom-left: up arrow with one dot. Bottom-right?
- up arrow with two dots
- up arrow with one dot
- down arrow with two dots
- down arrow with one dot (correct answer)
Explanation: Reading the grid by rows, the arrow flips from up to down across each row, so the bottom-right arrow must point down. The dot count stays constant within each row: top row has two dots, bottom row has one dot. Thus the missing card is a down arrow with one dot. The tempting up arrow with one dot keeps the dot count but misses the left-to-right direction flip.
Question 10
Examine the matrix below. Which choice completes the pattern?
- A square containing 1 horizontal line
- A square containing 2 horizontal lines
- A square containing 1 vertical line
- An empty square (correct answer)
Explanation: Rule: col 3 = col 1 − col 2 (remove from col 1 the lines that appear in col 2). Row 3 col 1 has 2 horizontal lines; col 2 also has 2 horizontal lines at the same positions. Subtracting leaves no lines — an empty square. A removes only one line. B fails to subtract at all. C changes line orientation (not part of the rule).
Question 11
Refer to the figure matrix. What belongs in the missing cell?
- A diamond with a small white circle and a small black triangle inside
- A diamond with a small black circle and a small white triangle inside (correct answer)
- A diamond with a small black circle and a small black triangle inside
- A diamond with a small white circle and a small white triangle inside
Explanation: Two independent transformations: (1) the circle's color alternates black-white-black across each row; (2) the triangle's color alternates white-black-white across each row. Row 3 col 3 should have a black circle and a white triangle. A swaps both colors. C gives both elements black. D gives both elements white.
Question 12
Examine the matrix of figures carefully. Which option completes the pattern?
- A cross shape composed of 5 shaded squares (correct answer)
- A cross shape composed of 5 squares with alternate shading
- A horizontal row of 3 shaded squares
- A vertical column of 3 shaded squares
Explanation: Across each row, col 3 is the overlay (union) of col 1 and col 2. In row 3, col 1 is a horizontal row of 3 shaded squares and col 2 is a vertical column of 3 shaded squares, sharing the center. Their union forms a plus/cross of 5 shaded squares. B changes the shading (not part of the rule). C and D are the original inputs, not their union.