ACT Science Quiz: Interpreting Data From Diagrams
20 questions · exam conditions
0:00
Interpreting Data From DiagramsQuestion 1 of 20

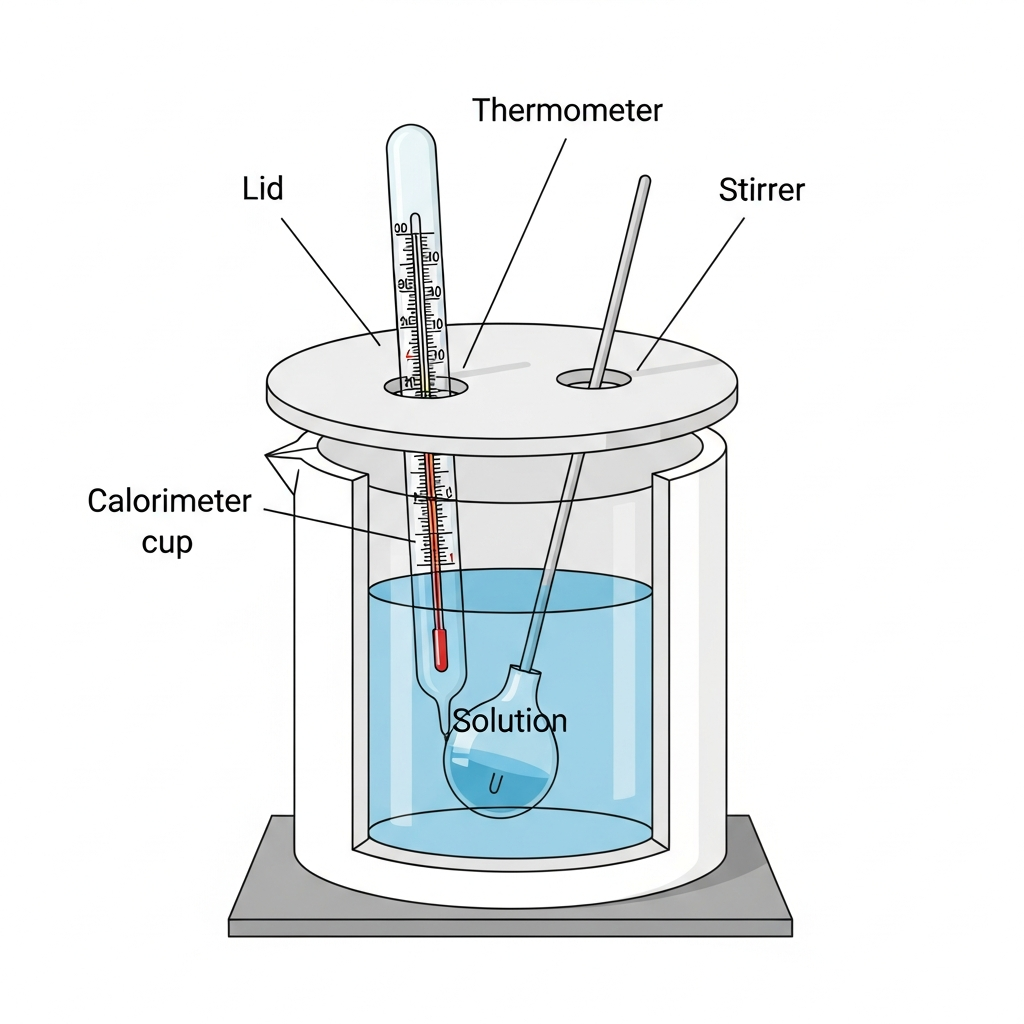
A student uses a calorimeter to measure heat released by dissolving a salt in water. Figure 1 shows the calorimeter cup, lid, thermometer, and stirrer, including which parts contact the solution. According to Figure 1, which component is inserted through the lid and extends into the solution to measure temperature?
Question graphic
The stirrer rod
The thermometer probe
The insulating foam jacket
The outer support ring
← Back to quizzes

ACT Science Quiz

ACT Science Quiz: Interpreting Data From Diagrams

Practice Interpreting Data From Diagrams in ACT Science with focused quiz questions that help you check what you know, review explanations, and build confidence with test-style prompts.

What this quiz covers

This quiz focuses on Interpreting Data From Diagrams, giving you a quick way to practice the rules, question types, and explanations that matter most for ACT Science.

How to use this quiz

Try each quiz question before looking at the correct answer. Use the explanations to review missed ideas, then come back to similar questions until the pattern feels familiar.

All questions

Question 1

A student uses a calorimeter to measure heat released by dissolving a salt in water. Figure 1 shows the calorimeter cup, lid, thermometer, and stirrer, including which parts contact the solution. According to Figure 1, which component is inserted through the lid and extends into the solution to measure temperature?

  1. The stirrer rod
  2. The thermometer probe (correct answer)
  3. The insulating foam jacket
  4. The outer support ring
Explanation: The calorimeter diagram shows a cross-sectional view with the lid on top and various components passing through it. The thermometer probe is clearly shown as a long, thin instrument that passes through a hole in the lid and extends down into the solution inside the calorimeter cup. This positioning allows it to measure the temperature of the solution directly. The stirrer rod also passes through the lid but serves a different function of mixing the solution.

Question 2

A biologist traces airflow through a simplified human respiratory system diagram (Figure 1). Arrows indicate the direction of airflow during inhalation. Based on Figure 1, air flows from the trachea directly into the:

  1. Esophagus
  2. Bronchi (correct answer)
  3. Diaphragm
  4. Alveoli
Explanation: The respiratory system diagram shows the trachea as the main airway that branches into two tubes labeled as bronchi. Arrows indicating airflow during inhalation show air moving down the trachea and then splitting into the left and right bronchi at the branching point. The bronchi then continue to branch into smaller airways leading to the alveoli. The diagram clearly shows this direct connection between trachea and bronchi without any intervening structures.

Question 3

A hydrologist drilled four wells across a hillside and recorded the depth of the bottom of each well. The water table is the upper surface of the saturated zone; a well yields water only if it extends below the water table. Figure 1 shows a cross section of the hillside.

According to Figure 1, which well does not extend below the water table?

  1. Well 1
  2. Well 2 (correct answer)
  3. Well 3
  4. Well 4
Explanation: The water table in Figure 1 deepens from left to right, from 6 m below the surface at the left edge to 14 m at the right edge. Well 2 is drilled to 8 m at a point where the water table lies at about 9 m, so its bottom sits above the saturated zone. Wells 1, 3, and 4 all end below the water table line at their positions and would yield water.

Question 4

Figure 1 shows a vertical cross section of four rock layers that have been cut by a fault. The rock on the right side of the fault has moved downward relative to the rock on the left side. Depths are measured below the ground surface on the left side.

According to Figure 1, how far has the rock on the right side of the fault moved down relative to the rock on the left side?

  1. 2 m
  2. 3 m
  3. 4 m (correct answer)
  4. 6 m
Explanation: Track any single layer boundary across the fault. The top of Layer L sits at 5 m on the left side and at 9 m on the right side, a drop of 4 m; the top of Layer M sits at 11 m on the left and 15 m on the right, the same 4 m drop. The 6 m option is the thickness of Layer L rather than the offset.

Question 5

Figure 1 shows the paths by which nitrogen atoms move among five reservoirs in an ecosystem. Each arrow points in the direction that nitrogen moves.

Based on Figure 1, a nitrogen atom moving from atmospheric nitrogen gas into plant protein passes through which sequence of soil reservoirs?

  1. Nitrite, then ammonium, then nitrate
  2. Nitrate, then nitrite, then ammonium
  3. Ammonium, then nitrate only
  4. Ammonium, then nitrite, then nitrate (correct answer)
Explanation: Following the arrows in Figure 1 from atmospheric nitrogen gas: nitrogen fixation leads to ammonium, step 1 leads from ammonium to nitrite, step 2 leads from nitrite to nitrate, and assimilation leads from nitrate into plant protein. The order is ammonium, nitrite, nitrate. The option beginning with nitrate reverses that order, and no arrow connects ammonium directly to nitrate.

Question 6

Figure 1 is a surface pressure map for one region. Each isobar connects points of equal air pressure, and adjacent isobars differ by 4 millibars. Wind speed increases as the horizontal distance between neighbouring isobars decreases.

Based on Figure 1, at which site would the wind be fastest?

  1. Site J
  2. Site K (correct answer)
  3. Site L
  4. Site M
Explanation: The isobars in Figure 1 are spaced most closely near Site K, so pressure changes over the shortest horizontal distance there and the wind is fastest. Sites J, L, and M all sit where neighbouring isobars are farther apart, indicating slower wind.

Question 7

Figure 1 shows a block resting on a surface inclined at 30° to the horizontal. Four forces acting on the block are drawn as arrows. The normal force is the force that a surface exerts on an object, and it always acts perpendicular to that surface, directed away from it.

According to Figure 1, which labeled arrow represents the normal force on the block?

  1. Force 1 (correct answer)
  2. Force 2
  3. Force 3
  4. Force 4
Explanation: Force 1 is the only arrow in Figure 1 drawn at a right angle to the inclined surface and pointing away from it, which is the definition of the normal force given in the passage. Force 2 points straight down, the direction of the block's weight. Forces 3 and 4 lie along the surface rather than perpendicular to it.

Question 8

Figure 1 shows two light rays leaving the top of an object and passing through a converging lens. The lens sits at the 0 cm mark, and its focal points are marked F on each side. An image forms where the rays meet after passing through the lens.

According to Figure 1, the image forms at what distance from the lens?

  1. 4 cm
  2. 6 cm
  3. 8 cm (correct answer)
  4. 12 cm
Explanation: The two rays drawn in Figure 1 cross at the 8 cm mark on the right side of the lens, so the image forms 8 cm from the lens. The 4 cm mark is the focal point F, not the image position, and the object itself sits 8 cm to the left of the lens.

Question 9

Figure 1 shows a circuit built by a physics student. An ammeter is connected in line with the circuit to measure current, and a voltmeter is connected across a single component to measure the potential difference between its two ends.

According to Figure 1, the voltmeter measures the potential difference across which component?

  1. R3
  2. The battery
  3. R1
  4. R2 (correct answer)
Explanation: In Figure 1 the two leads of the voltmeter connect to the wire on either side of R2, so it measures the potential difference across R2 alone. The ammeter sits in the main loop rather than across any component. The voltmeter's leads do not touch the battery terminals or the ends of R1 or R3.

Question 10

After an earthquake, three seismograph stations each calculated their distance from the epicenter. In Figure 1, a circle is drawn around each station with a radius equal to that distance, so the epicenter lies somewhere on each circle.

Based on Figure 1, which labeled point is the epicenter of the earthquake?

  1. Point J (correct answer)
  2. Point K
  3. Point L
  4. Point M
Explanation: The epicenter must lie on all three circles at once, which happens only where the three circles intersect. In Figure 1 that single common point is Point J. Each of Points K, L, and M lies clearly inside or outside at least one of the three circles, so none of them can be on all three at once.

Question 11

Figure 1 shows six reservoirs of water and the processes that move water between them. Each arrow points in the direction that water moves.

According to Figure 1, which two processes move water into the water vapor reservoir?

  1. Evaporation and transpiration (correct answer)
  2. Evaporation and condensation
  3. Condensation and precipitation
  4. Infiltration and runoff
Explanation: Two arrows in Figure 1 point toward the water vapor reservoir: evaporation from the ocean and transpiration from plants. The condensation arrow points away from water vapor toward clouds, and infiltration and runoff both move water away from the land surface without reaching the vapor reservoir.

Question 12

A soil scientist recorded the four horizons present at a study site and the maximum depth reached by the roots of three plants growing there. Figure 1 shows the results.

According to Figure 1, the roots of which plant extend into Horizon C?

  1. Oak tree only (correct answer)
  2. Shrub and oak tree
  3. Shrub only
  4. Grass only
Explanation: Horizon C begins at a depth of 1.8 m in Figure 1. The oak tree's roots reach 2.6 m, past that boundary. The shrub's roots stop at 1.5 m and the grass's roots stop at 0.5 m, both of which are above 1.8 m and therefore still within Horizon B or above.

Question 13

Ecologists mapped the feeding relationships among six organisms in a grassland community. The results are shown in Figure 1.

Based on Figure 1, which organism serves as a direct food source for both the snake and the hawk?

  1. Grasshopper
  2. Rabbit
  3. Grass
  4. Mouse (correct answer)
Explanation: Two arrows leave the mouse in Figure 1: one to the snake and one to the hawk, so the mouse is eaten by both. The grasshopper's only outgoing arrow goes to the snake, and the rabbit's only outgoing arrow goes to the hawk. Grass is eaten by the grasshopper, mouse, and rabbit, but by neither the snake nor the hawk.

Question 14

Figure 1 shows an apparatus used to separate a liquid mixture by distillation. The mixture is heated in the flask, the vapor that forms travels through the apparatus, and the purified liquid is collected. Cold water flows through the outer jacket of the sloping tube.

Based on Figure 1, at which labeled location does vapor first cool enough to return to the liquid state?

  1. Location 1
  2. Location 2
  3. Location 3 (correct answer)
  4. Location 4
Explanation: Location 3 marks the sloping tube surrounded by the cold water jacket, the only part of the apparatus in Figure 1 that is actively cooled, so vapor condenses there. Location 1 is the heated flask and Location 2 is the thermometer above it, both of which the vapor passes while still hot. Location 4 is the receiving flask, which the liquid reaches only after condensing.

Question 15

Figure 1 shows a cross section of a single plant cell as seen under a microscope, with five structures labeled.

According to Figure 1, which structure lies immediately inside the cell wall?

  1. Chloroplast
  2. Cell membrane (correct answer)
  3. Central vacuole
  4. Nucleus
Explanation: In Figure 1 the cell wall is the outermost boundary, and the cell membrane is drawn directly against its inner surface. The central vacuole, the nucleus, and the chloroplasts all sit farther in, within the cytoplasm enclosed by the membrane.

Question 16

Figure 1 is a topographic map of a hillside. Each contour line connects points that are at the same elevation, and adjacent lines differ by 10 m. Where contour lines are drawn close together, elevation changes over a short horizontal distance.

Based on Figure 1, at which labeled point is the ground steepest?

  1. Point W
  2. Point X (correct answer)
  3. Point Y
  4. Point Z
Explanation: Steepness corresponds to how closely the contour lines are spaced. In Figure 1 the lines are packed most tightly around Point X, so elevation changes fastest there. Point W sits near the top of the hill, where the contours are widely spaced, and Points Y and Z lie on the outer flank, where the spacing is wider than at Point X.

Question 17

A geology student examined a vertical cross section of an exposed rock outcrop. Figure 1 shows the five rock layers that were present and the depth of each boundary below the ground surface.

According to Figure 1, what is the thickness of Layer III?

  1. 4 m
  2. 5 m
  3. 6 m (correct answer)
  4. 9 m
Explanation: Figure 1 places the top of Layer III at a depth of 9 m and its base at a depth of 15 m. The thickness is the difference between those depths: 15 m − 9 m = 6 m. The 4 m option is the thickness of Layer V, the 5 m option is the thickness of Layer IV, and the 9 m option is the depth of the top of Layer III rather than a thickness.

Question 18

Figure 1 traces the path taken by blood as it circulates through the heart, the lungs, and the rest of the body. Each arrow points in the direction that blood flows.

According to Figure 1, blood leaving the lungs flows into which structure next?

  1. Right atrium
  2. Left ventricle
  3. Left atrium (correct answer)
  4. Body tissues
Explanation: The arrow leaving the lungs in Figure 1 points to the left atrium. From there a separate arrow carries blood to the left ventricle and then to the body tissues, so those structures are reached later. The right atrium receives blood returning from the body tissues, before the lungs rather than after.

Question 19

Figure 1 shows three bulbs connected in parallel across a battery. When switch S is closed, all three bulbs are lit. Each branch of a parallel circuit provides a separate path for current, so opening a switch in one branch stops current only in that branch.

Based on Figure 1, which bulbs remain lit once switch S is opened?

  1. Bulbs 1 and 3 (correct answer)
  2. Bulb 1 only
  3. Bulb 2 only
  4. All three bulbs
Explanation: Figure 1 shows switch S in the branch containing Bulb 2 only. Opening S breaks that branch, so Bulb 2 goes out. Bulbs 1 and 3 sit in separate branches that still connect to both battery terminals, so both stay lit.

Question 20

Figure 1 shows the order in which food passes through five parts of the digestive tract, along with two organs that release substances into the tract. Each arrow points in the direction that material moves.

Based on Figure 1, bile from the liver and enzymes from the pancreas are both released into which organ?

  1. Stomach
  2. Large intestine
  3. Esophagus
  4. Small intestine (correct answer)
Explanation: Figure 1 shows the bile arrow from the liver and the enzyme arrow from the pancreas both ending at the small intestine. Neither arrow points to the esophagus, the stomach, or the large intestine; those parts of the tract are connected only by the arrows tracing the path of food.